Kubernetes powers a variety of modern applications. We can even say it has become the de facto standard for container orchestration. Websites with heavy traffic, cloud-native environments, and industries relying on high-performance computing actively use this functional and scalable system.
As often happens, such flexibility comes with various security challenges. Research by Red Hat found that 67% of companies delay or slow down application deployment for security reasons. 46% of respondents experienced revenue or customer loss due to a Kubernetes security incident.
Despite the benefits, Kubernetes is only as secure as the strategy you put in place. In this Kubernetes security guide, we’ll highlight the best Kubernetes practices that will improve your security posture.
What is Kubernetes Security?
The Kubernetes ecosystem allows you to create declarative application deployments, dynamically configure environments, create backups and synchronize data, define access control rules for resources and secrets (and isolate them), configure cluster-wide security standards, add various authentication mechanisms, integrate applications with cloud environments, and centrally log events. And all of this must be implemented in accordance with cybersecurity best practices.
Indeed, the number of moving parts and settings is impressive. At first glance, it’s not even clear how to begin checking your cluster for compliance with these “best practices.” So, let’s start from an introduction of a methodology for auditing the security of Kubernetes clusters — a methodology that has saved me more than once during pentests.
Structure of a Kubernetes cluster
First, let’s recall what a cluster actually consists of; then we’ll build a threat model and a practical testing approach. According to the Kubernetes documentation, each cluster at a high level is described by the following diagram:
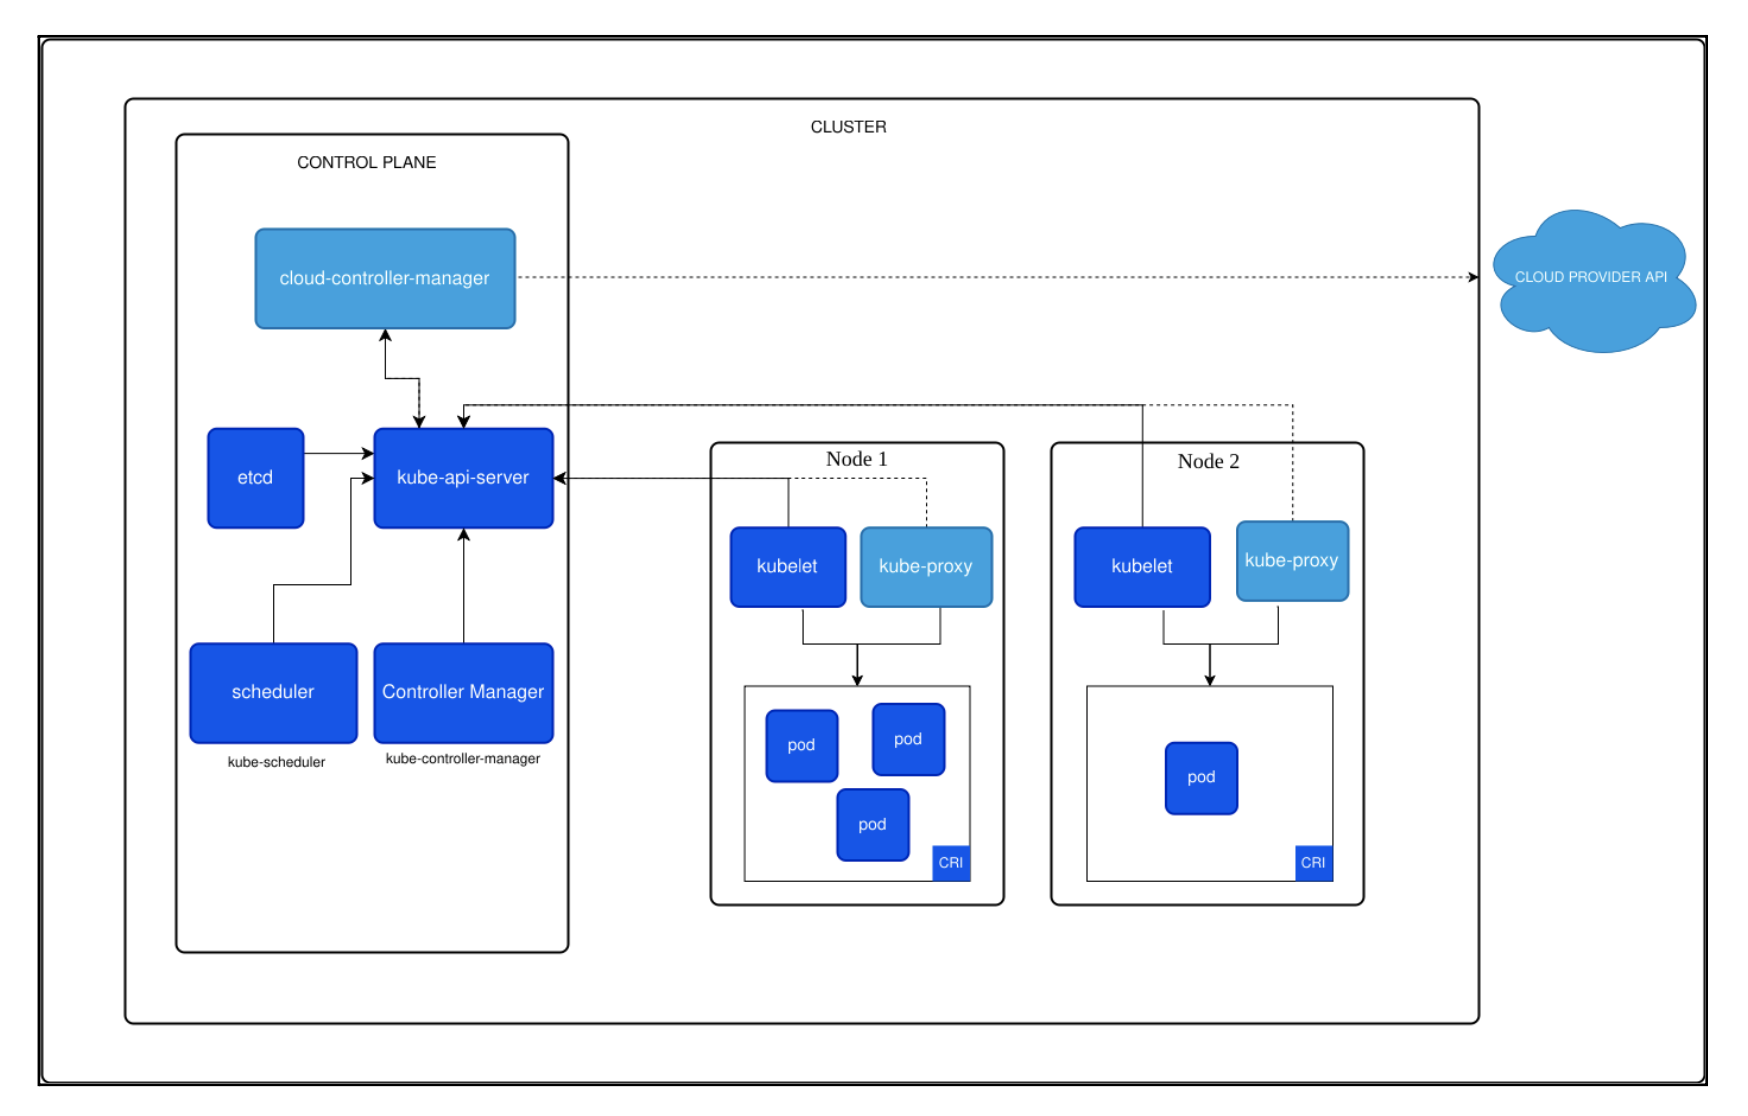
A cluster is conventionally divided into the “Control Plane” and the “Data Plane.” Within the Control Plane, the cluster components responsible for the cluster’s lifecycle are running. These include:
- kube-apiserver – the frontend for all Control Plane APIs, meaning all requests to the cluster’s system components pass through it.
- etcd – a key-value store containing all of the system information about the cluster.
- kube-scheduler – responsible for choosing the best node (server) on which to run containers.
- kube-controller-manager – the manager of controllers. Controllers are auxiliary cluster components responsible for some specific aspect. For example, the ServiceAccount controller ensures a default service account exists in each namespace.
- cloud-controller-manager (Optional) – encapsulates logic for interacting with cloud environments. For instance, the Service controller is responsible for creating and deleting load balancers in the cloud environment.
Next, let’s look at what makes up the Data Plane. This part of the cluster runs the containerized applications themselves. Each cluster’s Data Plane has the following components:
- kubelet – an agent running on each node. It ensures that all containers created through Kubernetes are up and running without interruption.
- kube-proxy (Optional) – a network proxy responsible for load balancing traffic among pods, as well as enforcing network communication rules between cluster resources and external resources. It may be absent if the cluster uses network add-ons that provide the same functionality.
- Container Runtime – a fundamental Kubernetes component that actually runs containers and manages their lifecycle. Kubernetes supports various runtimes implementing the Kubernetes CRI (Container Runtime Interface), such as containerd and CRI-O.
Kubernetes also allows for installing add-ons that expand its functionality, for example:
- DNS – an add-on that provides a DNS server within the cluster.
- K8s Dashboard – installs a web component for visualizing the cluster’s state.
- Network Plugins – additional components that implement the Container Network Interface and handle traffic addressing in the cluster.
Whitebox Audit of Kubernetes
Now that we know what the cluster is made of, we can discuss the security audit methodology. Following this methodology will help you find the maximum number of vulnerabilities in the least amount of time, and you can memorize the method itself in about 30 seconds.
Benchmarking
The first step at the beginning of an audit is to run quick benchmarking checks that provide a rapid overview of the cluster’s security posture at a high level. For this, you can use tools such as kube-bench and Popeye. Their output will show containers running as the root user, network policy misconfigurations, missing CPU and memory usage limits, pods with service accounts, and more. At this stage, it is also worthwhile to download the entire cluster’s configurations in YAML format, for example:
kubectl get all -A -o yaml > cluster.yamlNetwork Policies and Services Review
By default, all pods in Kubernetes run in a flat network, meaning any pod can establish a network connection with any other pod. This is an unsafe configuration, so administrators create Network Policies to regulate inbound and outbound traffic for each pod. You need to verify that each pod only allows inbound traffic from pods that actually depend on it and can only establish connections with the pods or servers necessary for its operation.
To test the effectiveness of these policies, you can choose two containers that definitely should not communicate with each other (for example, a database and the application’s frontend container) and attempt to transfer a file via TCP using netcat, curl, python, or any other similar tool. In addition, review Service resources, since they might provide unwanted access to pods for external Internet users or users on the local network.
Checking Authentication on Kubernetes APIs
Kubernetes allows you to configure anonymous access to kube-apiserver, etcd, and kubelet. This is a serious vulnerability because anonymous access to kubelet lets an attacker run arbitrary code inside every container on the node, while access to kube-apiserver or etcd is effectively equal to full cluster access with administrator privileges.
RBAC / ABAC Testing
Kubernetes lets you create users, groups, and service accounts. All of these can authenticate to kube-apiserver and perform certain actions in the cluster — such as creating a pod, reading a secret, or deleting a deployment. Having excessive permissions in Kubernetes can let an attacker escalate privileges, gain unauthorized access to sensitive data, modify deployments and environments, or even bring down the cluster.
Below is a list of the most dangerous permissions:
- GET secrets + CREATE secrets → Allows you to obtain tokens for other service accounts
- CREATE / UPDATE Pod, Deployment, DaemonSets, StatefulSets, ReplicationControllers, ReplicaSets, Jobs, and CronJobs → Allows root-level access to nodes, as well as to Kubernetes secrets and service accounts
- EXEC into Pods → Allows access to secrets and service account tokens used by those pods
- IMPERSONATE / CREATE Token → Lets you use the Kubernetes API as other service accounts
- CREATE / UPDATE (Cluster)Role and (Cluster)RoleBinding + ESCALATE OVER (Cluster)Roles → Allows modification of the permissions granted to roles
During every audit, you must verify that these permissions are granted only to the service accounts (users, groups) that truly need them for their daily tasks, following the principle of least privilege. To do this, you can use tools such as kubectl-who-can, rbac-police, PurplePanda, or simply run commands like:
kubectl auth can-i <action> <resource> --as=<principal>K8s Secrets Review
Kubernetes secrets contain highly sensitive information — API keys, passwords, certificates, and access tokens. You need to verify that each secret is accessible only to the service accounts (users, groups) that truly need them for daily operations. You can do this using kubectl-who-can and:
kubectl auth can-i get secrets/<secret> --as=<principal> Additionally, ensure there are no long-lived credentials for cloud accounts or Kubernetes service accounts stored in those secrets. Finally, confirm that ETCD encryption is enabled, since secrets are stored in etcd.
Host Security Audit
Control Plane and Data Plane containers run on regular servers (or virtual machines), so you must ensure these hosts are secure. Having local access to nodes can allow an attacker to run code in all containers running on those nodes (assuming the local user has such privileges or root access). Therefore, check that nodes are free of vulnerabilities, that only those who need access have it (with the fewest privileges possible), and that there are no vectors for local privilege escalation. A useful tool for speeding up these checks is PEASS-ng.
Container Security Audit
Everything in Kubernetes runs in containers, so container vulnerabilities can jeopardize the entire cluster. First, you should verify that container registry access is limited to those who need it for their daily tasks. Next, scan the container images for vulnerabilities using Trivy or Snyk, and also check for any hardcoded secrets using docker history and Dive. In addition, verify whether an attacker can escape from containers to the host — for instance, through privileged settings or sensitive mounts. Finally, ensure that containers are not running as root.
Cloud-Managed Clusters Checks
Using cloud services such as EKS, AKS, and GKS slightly changes the attack surface. If the cloud provider manages the cluster’s Control Plane, you no longer need to check etcd encryption or authentication on the Kubernetes API endpoints—these are handled by the cloud-based Kubernetes service. However, new risks appear that are specific to cloud environments:
- Exposed IMDS Endpoints
IMDS endpoints are specialized APIs in cloud environments from which virtual machines retrieve temporary keys for accessing cloud resources (buckets, serverless functions, secret managers, etc.). If a container has network access to the IMDS, it can gain unwanted access to the cloud infrastructure. This is especially dangerous in environments requiring strict isolation among different tenants in a single cloud account. - Misconfigurations in Role Trust Policies / Workload Identities
In addition to IMDS endpoints, cloud providers offer mechanisms such as Role Trust Policies (AWS) and Workload Identities (GCP), allowing you to grant access to cloud resources for a specific Kubernetes service account. But if these policies are misconfigured, they might grant access to cloud components not just to one service account but to an entire group — or even all service accounts in the cluster. You can spot this when there are wildcard “*” entries in the policy or if the “sub” directive is missing. - Using Long-Lived Cloud Credentials
The oldest and worst way to grant a service account access to cloud components is by generating persistent credentials for a cloud IAM user and passing them to the container via Kubernetes secrets, environment variables, or, worse, hardcoding them in the application’s source code. This approach greatly amplifies the impact of vulnerabilities that allow file reading, and it also complicates credential rotation in the cloud itself.
Required Access
To perform a White-Box pentest of a Kubernetes cluster, you need two users (or service accounts — it doesn’t really matter). The first is a read-only user, with permissions only to read all the cluster’s data. The second is an administrator, with both read and write permissions. The read-only account is needed for running automated benchmarking tools (for the cluster as well as RBAC/ABAC policies) and for reviewing secrets. The administrator account is required for accessing pods, verifying network policy configurations, and manually validating issues identified under read-only privileges.
Asking for administrator rights can raise eyebrows. Some people argue it’s better to provide granular permissions for every action the security auditor needs to perform — separate permissions for deploying pods, running “exec” operations, creating service account tokens for RBAC/ABAC checks, and so on. However, this approach is not more secure and only slows down the audit. The reason is that each of these permissions enables Kubernetes privilege escalation attacks, allowing you to forcibly gain far broader access.
For instance, having permission to run “exec” lets you capture all service account tokens in the cluster—you’d just have to enter each container and read the tokens from files. Permission to create pods might let you escape onto any node in the cluster and read tokens from directories like /var/*, or deploy a pod that automatically mounts tokens for any service account. Therefore, it’s simpler to grant administrator access right away rather than creating additional accounts in the middle of the audit.
Final Thoughts
Securing the Kubernetes environment isn’t the easiest task as it’s an evolving open source system with a variety of available configurations and numerous environment variables. It’s probably logical that such a multifaceted solution requires a multifaceted approach to its security.
Being aware of the common Kubernetes security issues and challenges helps strengthen defenses and minimize risks.
But Kubernetes security is an ongoing process. It requires continuous attention and adaptation to evolving security landscapes. And it’s a good idea to consider professional assistance in preparing a solid strategy that will evolve with your infrastructure and needs. If you are up to it, contact our team, and let’s discuss the details.